Upcoming book:

Related posts
Azure Serverless- Controlling outbound IPs through Azure NAT Gateway with Bicep
- Centralized Private Endpoints with Azure Bicep
- Passwordless CosmosDB from Container Apps with Bicep
- Azure DevOps: Bicep CI/CD Pipelines with bicepparam
- Azure DevOps: Bicep CI/CD Pipelines
- Introducing Appreg for Azure AD
- Reusing Azure Bicep modules
- PHP Symfony in Azure App Services
- Azure B2C custom policy with Azure Active Directory support
- Governance As Code with Azure Bicep
- Microservices with Azure Container Apps and Bicep templates
Real-time charts with Plotly and Azure SignalR Serverless
Table of contents
- Introduction
- Solution diagram
- Let's get started
- Cleaning up the index.html
- Cleaning up the Function code
- Adding JWT to our lambda
- Adding support for Event Grid
- Adding Plotly to the frontend
- A simple progress reporter console app
- Setting up the Azure testing environment
- Running the solution
- See it live
- Conclusion
Introduction
For my first blog post, I decided to talk about a subject I struggled with recently due to the lack of online resources: how to create plots that update in near-real time using Plotly in the frontend and Azure SignalR in the backend.
In order to make this reliable while keeping costs low, we’ll take it a step further and use the Serverless feature of Azure SignalR, by using a Function App to handle the transport (WebSockets for current clients) as well as server-side invocations to send the data to clients.
Solution diagram
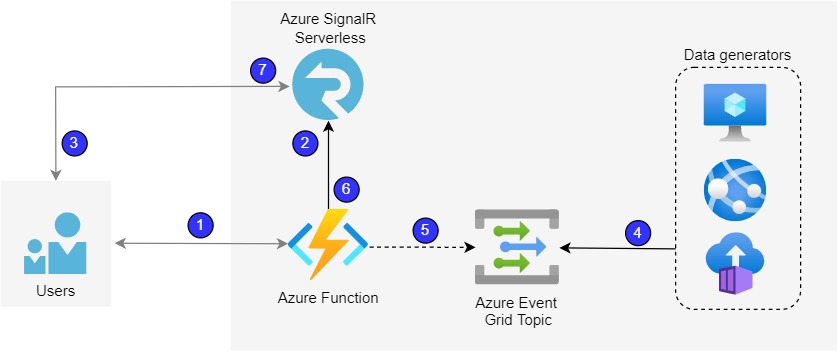
The flow goes like this:
- A user user opens our website, which in this case is provided by our Azure Function using an HTTP trigger, which returns an HTML file that we will be creating.
- The HTML contains JavaScript to connect to SignalR using the SignalR client library. To initiate the communication, the website calls our Azure Function which uses the Azure SignalR connection string to generate a connection URL for the user.
- The website then connects to the Azure SignalR server, which by default in modern browsers will be done using secure Web Sockets (WSS protocol).
- When our application generates data, it will send it to an Event Grid topic.
- Our Function will then, through a binding, be invoked with the Event Grid event data.
- Our Function will send the data to SignalR, which takes care of determining to which connections the data needs to be sent to.
- Finally, SignalR sends the data to the user, using the connection established in step 3, and the data is read by a JavaScript event handler and passed on to Plotly.
Now that we know what we want to achieve, we can start implementing our solution.
Let's get started
Note: in order to make this simple, I'm not going to worry about authentication/authorization, as the implementation depends on the environment. Also, we are going to use an HTTP trigger in our Function to serve the website.
Also note: our code will be based off a Microsoft Azure SignalR sample.
Lastly: we will send messages to all connected clients here, given that identifying which user(s) to send the messages to depends on the requirements and generally involves some sort of database.
Cleaning up the index.html
The sample comes with Vue and Bootstrap which we are not going to use, just to keep things simple, so we need to get rid of that. The sample also generates JWT tokens on the client, which is quite insecure, so let's remove that too and leave only the useful parts:
<html>
<head>
    <title>Real-time plots with Plotly</title>
    <script>
        window.apiBaseUrl = window.location.origin;
    </script>
</head>
<body>

    <script src="https://cdn.jsdelivr.net/npm/@aspnet/signalr@1.0.3/dist/browser/signalr.js"></script>
    <script>
        const apiBaseUrl = window.location.origin;
        const accessToken = "@@ACCESS_TOKEN@@";

        const connection = new signalR.HubConnectionBuilder()
            .withUrl(apiBaseUrl + '/api', {
                accessTokenFactory: () => accessToken
            })
            .configureLogging(signalR.LogLevel.Information)
            .build();

        connection.on('newMessage', onNewMessage);
        connection.start()
            .then(() => {
                console.log('connected!');
            })
            .catch(console.error);

        function onNewMessage(message) {

        };
    </script>
</body>
</html>
As you can see, we have an @@ACCESS_TOKEN@@ field where we need to put an actual JWT token. We'll take care of that in a later step.
While we are not going to make use of Authentication/Authorization in this tutorial, I thought it would be helpful to show how it can be achieved, especially since a way to know which connection belongs to which user is normally needed on production scenarios.
Cleaning up the Function code
Just as with the Index page, there's a lot of code that we don't need, so let's clean it up and reduce it to just:
public class SimpleChat : ServerlessHub
{
    private const string NewMessageTarget = "newMessage";

    [FunctionName("index")]
    public IActionResult GetHomePage([HttpTrigger(AuthorizationLevel.Anonymous)] HttpRequest req, ExecutionContext context)
    {
        var path = Path.Combine(context.FunctionAppDirectory, "content", "index.html");
        var index = File.ReadAllText(path);

        return new ContentResult
        {
            Content = index,
            ContentType = "text/html",
        };
    }

    [FunctionName("negotiate")]
    public SignalRConnectionInfo Negotiate([HttpTrigger(AuthorizationLevel.Anonymous)] HttpRequest req)
    {
        return Negotiate(req.Headers["x-ms-signalr-user-id"], GetClaims(req.Headers["Authorization"]));
    }

    [FunctionName(nameof(OnConnected))]
    public void OnConnected([SignalRTrigger] InvocationContext invocationContext, ILogger logger)
    {
        logger.LogInformation($"{invocationContext.ConnectionId} has connected");
    }

    [FunctionName(nameof(OnDisconnected))]
    public void OnDisconnected([SignalRTrigger] InvocationContext invocationContext, ILogger logger)
    {
        logger.LogInformation($"{invocationContext.ConnectionId} has disconnected");
    }
}
Now that we have cleaned the 2 important components, we can get started with adding the new pieces that we need.
Notice that the OnConnected and OnDisconnected methods aren't doing anything useful at the moment. Given the high importance of those handlers, I decided to leave them there anyway.
Important: notice that the Negotiate method is directly using the JWT token from the Authorization header to get claims for the user. That JWT needs to be validated in production code.
Adding JWT to our lambda
If you remember from step 1, we need to replace the field accessToken in our JavaScript code with an actual JWT. Let's do that with a quick and dirty example by modifying our Index HTTP trigger directly:
[FunctionName("index")]
public IActionResult GetHomePage([HttpTrigger(AuthorizationLevel.Anonymous)] HttpRequest req, ExecutionContext context)
{
    var path = Path.Combine(context.FunctionAppDirectory, "content", "index.html");
    var index = File.ReadAllText(path);

    var handler = new JwtSecurityTokenHandler();
    var token = handler.WriteToken(new JwtSecurityToken(
        issuer: req.Host.Value,
        audience: req.Host.Value,
        claims: new List<Claim>
        {
            new Claim(ClaimTypes.Name, "Camilo")
        },
        notBefore: DateTime.UtcNow,
        expires: DateTime.UtcNow.AddMinutes(10),
        signingCredentials: new SigningCredentials(new SymmetricSecurityKey(Encoding.UTF8.GetBytes("hello-world, again!")), SecurityAlgorithms.HmacSha256)));

    index = index.Replace("@@ACCESS_TOKEN@@", token);

    return new ContentResult
    {
        Content = index,
        ContentType = "text/html",
    };
}
With the above, we now have a JWT valid for 10 minutes every time the user loads the page, which is more than enough for our simple test.
Adding support for Event Grid
Now that the users can connect to our SignalR back-end, we need to add the final piece to our Function, an event handler for the Event Grid subscription. This is, fortunately, quite easy for our simple scenario.
We will use a helper model class that represents a data point in Plotly:
public class DataPoint
{
    public int X { get; set; }
    public int Y { get; set; }
}
And we can send the data to SignalR to all clients (to simplify the sample) like this:
[FunctionName(nameof(ReportProgress))]
public async Task ReportProgress([EventGridTrigger] EventGridEvent eventGridEvent)
{
    var data = eventGridEvent.Data.ToObjectFromJson<DataPoint[]>();
    await Clients.All.SendAsync(NewMessageTarget, data);
}
Of course, normally you'd have code here to determine to which client to send the notification, but as previously stated, we're not going to worry about that here.
For the above to work, you'll need to install the package Microsoft.Azure.WebJobs.Extensions.EventGrid.
Adding Plotly to the frontend
Now that our backend is ready, we can modify our frontend to have Plotly available as well as to actually use the messages received from the backend.
<body>
    <div id="plot">

    </div>

    <script src='https://cdnjs.cloudflare.com/ajax/libs/plotly.js/2.4.2/plotly.min.js'></script>
    <script src="https://cdn.jsdelivr.net/npm/@aspnet/signalr@1.0.3/dist/browser/signalr.js"></script>
    <script>
        // leave the rest as it was and then

        let variables = [];

        function onNewMessage(message) {
            if (variables.length === 0) {
                for (var i = 0; i < message.length; i++) {
                    variables.push({
                        x: [],
                        y: [],
                        type: "scatter"
                    });
                }
            }

            for (var i = 0; i < message.length; i++) {
                variables[i].x.push(message[i].X);
                variables[i].y.push(message[i].Y);
            }

            Plotly.newPlot('plot', variables);
        };
    </script>
</body>
Notice that we are creating a scatter plot for each variable that we receive in the first message. This code assumes that the variables are the same and in the same order for each message received. We could also generate this structure in the back-end, give a name to each variable, and a myriad of other things that PlotlyJS allows us to do. This only demonstrates a basic way of building the graph dynamically.
A simple progress reporter console app
We now have the backend and frontend completed! There are only a few tasks pending, writing the application that will write into the Event Grid Topic, and setting up the environment.
Let's get to the first. This can be done in a simple Console application:
public static async Task Main()
{
    var eventGridClient = new EventGridPublisherClient(
        new Uri(Configuration.EventGridTopic),
        new AzureKeyCredential(Configuration.EventGridKey));

    var random = new Random();

    for (int i = 0; i < 11; i++)
    {
        // Generate data points for 2 variables
        var data = new DataPoint[] {
            new() { X = i, Y = random.Next(1, 100) },
            new() { X = i, Y = random.Next(1, 100) }
        };

        await eventGridClient.SendEventAsync(new EventGridEvent("test", "test", "1.0", data));

        await Task.Delay(500); // Allow some time between data points
    }
}
The configuration class above is only to keep inline with Microsoft best-practices of hiding sensitive configuration, but it is a simple class such as:
internal static class Configuration
{
    public static string EventGridKey { get; } = Environment.GetEnvironmentVariable("EventGridKey", EnvironmentVariableTarget.Process);
    public static string EventGridTopic { get; } = Environment.GetEnvironmentVariable("EventGridTopic", EnvironmentVariableTarget.Process);
}
Setting up the Azure testing environment
Now that we have our solution ready, we need to set up the Azure environment for deploying our resources.
First, follow the guide to create the resources needed for the SignalR part of this tutorial: Create Azure SignalR Service. Once that is done, follow the next steps to deploy the function. After that, create a new Event Grid Topic. Add an Event Subscription in the Event Grid Topic and select the Function deployed in step 1 as the endpoint. For the Console app, we need to copy one of the keys under Access Keys on the Event Grid Topic page.
Running the solution
Now that we have everything ready, let's see it in action! The video below was recorded from the sample that can be found in the GitHub repository. I also added a button to trigger the data generation to make it simpler to test.
See it live
The sample we have created has been published to Azure, with a few improvements, and can be found here: https://ct-blog-realtimecharts-fa.azurewebsites.net/api/index.
Conclusion
We now have a fully functional real-time plotting solution, from the frontend with Plotly, to the backend with Azure SignalR Serverless, and the progress sender using Azure Event Grid. There are, of course, multiple things to take care of before using this code in production, like properly handling user authentication/authorization, and batching the data sent to Event Grid to optimize costs and performance of the solution.
You can find the sample solution in my GitHub repository: https://github.com/CamiloTerevinto/Blog.
I hope you've enjoyed my first post and please feel free to ask any questions or add any comments/suggestions. See you in the next post!