My other posts
Controlling outbound IPs through Azure NAT Gateway with Bicep
Table of contents
Introduction
In this post, we'll be looking at using Bicep to create NAT Gateways. You may want to use a NAT Gateway, for example, in the following scenarios:
- You have one or more private Virtual Machines that need internet connectivity. Once the default outbound IPs are removed, which is set to happen on 30 September 2025, you will need to provide a way to reach the internet, and a NAT Gateway is one option.
- You want to have control of the outbout IP, or the set of IPs, used by an Azure App Service, an Azure Container Apps, or similar.
Here's a sample diagram for what we'll be achieving with this post:
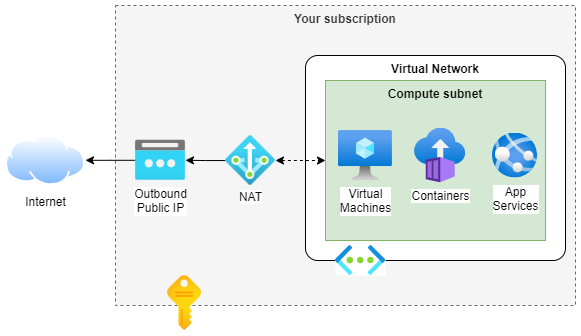
To briefly explain what is needed, you need:
- A Virtual Network, with at least one Subnet. This subnet could be used to host Virtual Machines, or it could be delegated to App Services or Container Apps, among others.
- One or more Standard SKU Public IPs, or otherwise a Public IP Prefix.
- A NAT Gateway that uses the Public IPs or Public IP Prefix, and is configured to be connected to the Subnet.
You'll also need the resource that you want to use, which would depend on your scenario. We'll use an App Service to make this post shorter.
Required components
For the sake of shortness, I'll only add parameters the first time they are used. For production code, you'd typically want to separate this into multiple files.
NAT Gateway
We'll start with the creation of the NAT Gateway with a single Public IP. We'll need the ID of the NAT Gateway for the creation of the subnet.
param location string = resourceGroup().location
param publicIPName string
param natGatewayName string

resource publicIp 'Microsoft.Network/publicIPAddresses@2023-05-01' = {
  name: publicIPName
  location: location
  sku: { name: 'Standard' }
  properties: {
    publicIPAddressVersion: 'IPv4'
    publicIPAllocationMethod: 'Static'
    idleTimeoutInMinutes: 4
  }
}

resource natGateway 'Microsoft.Network/natGateways@2023-05-01' = {
  name: natGatewayName
  location: location
  sku: {
    name: 'Standard'
  }
  properties: {
    idleTimeoutInMinutes: 4
    publicIpAddresses: [ { id: publicIp.id } ]
  }
}
Virtual Network
We can now create the Virtual Network and its subnet, with the App Service delegation.
param vnetName string
param subnetName string

resource virtualNetwork 'Microsoft.Network/virtualNetworks@2023-05-01' = {
  name: vnetName
  location: location
  properties: {
    addressSpace: { addressPrefixes: [ '10.0.0.0/16' ] }
    subnets: [
      {
        name: subnetName
        properties: {
          addressPrefix: '10.0.0.0/24'
          delegations: [
            {
              name: 'Microsoft.Web.serverFarms'
              properties: { serviceName: 'Microsoft.Web/serverFarms' }
            }
          ]
          natGateway: { id: natGateway.id }
        }
      }
    ]
  }
}
App Service
The final component needed is the App Service used for testing. Note that we'll use VNET integration to achieve our goal:
param appServicePlanName string
param webApplicationName string

resource appServicePlan 'Microsoft.Web/serverfarms@2022-09-01' = {
  name: appServicePlanName
  location: location
  sku: {
    name: 'B1'
    capacity: 1
  }
}

resource webApplication 'Microsoft.Web/sites@2022-09-01' = {
  name: webApplicationName
  location: location
  properties: {
    serverFarmId: appServicePlan.id
    virtualNetworkSubnetId: virtualNetwork::subnet.id
    vnetRouteAllEnabled: true
  }
}
Conclusion
Cloud networking can be a daunting topic. IaC languages like Bicep can make networking be simpler to manage and less error prone.
Bicep projects can (and should) also be treated with CI/CD (Continuous Integration and Continuous Delivery), and if you are interested in doing that with Azure DevOps, see this blog post of mine.
I hope you found this post useful, and if you have any questions, comments, ideas... feel free to leave a comment!