My other posts
Azure DevOps: Bicep CI/CD Pipelines
Table of contents
Introduction
In this post, we'll be looking at how to create Azure DevOps build and release pipelines for Azure Bicep deployments.
I will show all the configuration that is needed to achieve this, in a manner that should work for both Azure DevOps Services and Azure DevOps Server.
Our Bicep project
To keep things simple, we'll be deploying an Azure SQL Server resource. This will allow us to see that we can also use secret variables in Azure DevOps easily, so our secrets are safe all the way through.
Let's assume we have this sample main.bicep file:
@description('Location for all resources.')
param location string = resourceGroup().location

@description('The name of the SQL Server resource.')
param sqlServerName string

@description('The administrator username for SQL Server.')
param sqlServerAdministratorLogin string

@description('The administrator password for SQL Server.')
@secure()
param sqlServerAdministratorLoginPassword string

resource sqlServer 'Microsoft.Sql/servers@2022-11-01-preview' = {
  name: sqlServerName
  location: location
  properties: {
    administratorLogin: sqlServerAdministratorLogin
    administratorLoginPassword: sqlServerAdministratorLoginPassword
  }
}
This would deploy (if it doesn't already exist) an Azure SQL Server using the specified name, administrator username and password, in the resource group's location. The resource group is going to be specified later when using the Bicep CLI.
We also need to have the main.parameters.json file for the parameters declared in our Bicep file, ignoring the location:
{
  "$schema": "https://schema.management.azure.com/schemas/2015-01-01/deploymentParameters.json#",
  "contentVersion": "1.0.0.0",
  "parameters": {
    "sqlServerName": { "value": "" },
    "sqlServerAdministratorLogin": { "value": "" },
    "sqlServerAdministratorLoginPassword": { "value": "" }
  }
}
You could, of course, add more parameters and other resources to the deployment. For this post, I just want to keep things simple as the focus is on the Azure DevOps side of things.
Environment set up
Before starting with the pipelines, let's ensure we have the resources we need. This includes:
- An Azure subscription and a resource group in it.
- An Azure Active Directory App Registration (commonly known as Service Principal) with enough permissions to deploy to the resource group.
- A Service Connection in Azure DevOps.
I will assume here that you already have a subscription and the resource group as well.
If you are using Azure DevOps Services, you can achieve steps 2 and 3 together by following this excellent Microsoft Learn article. Otherwise, you will have to first create the Service Principal and then create the Service Connection.
For this guide, let's assume the Service Connection has a name of BicepDeploymentConnection and that the built-in Contributor role was given to the Service Principal for the Resource Group where we will be deploying the SQL Server, as follows:
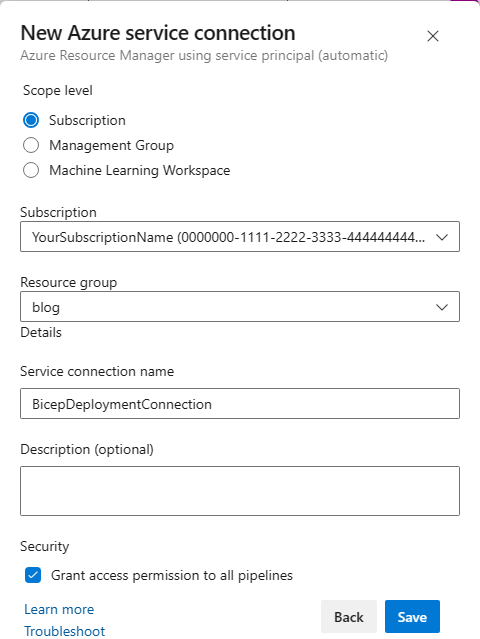
You don't have to grant access to all pipelines in the project if you prefer to control the access.
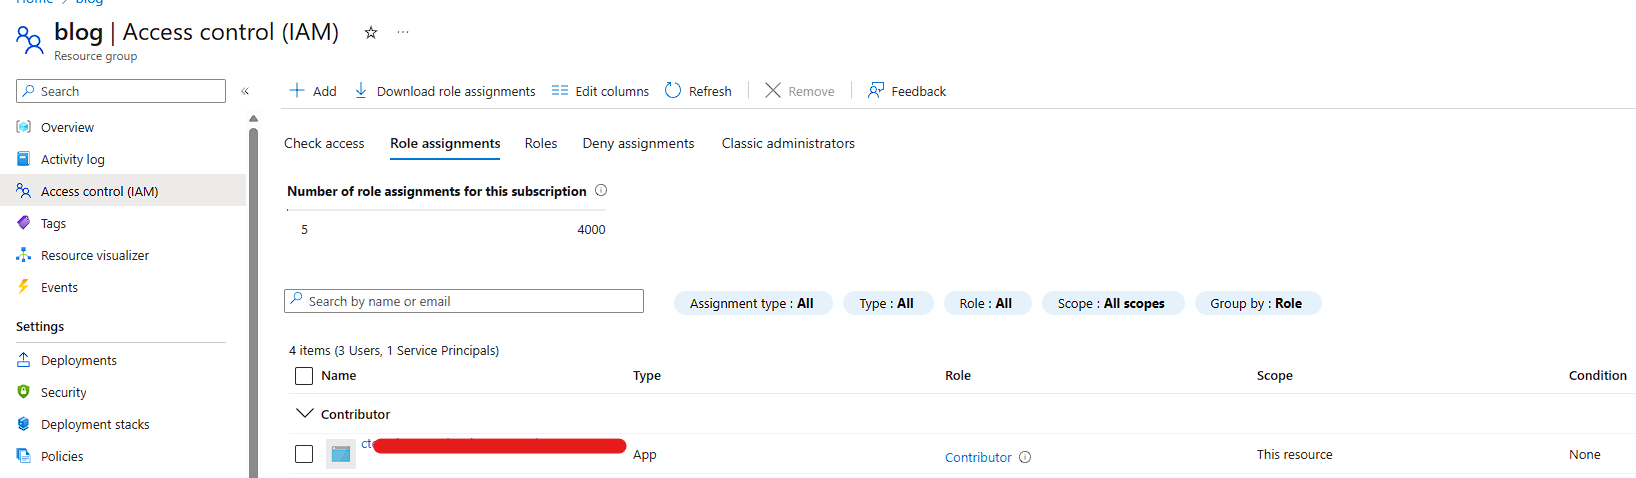
For the sake of simplicity, the Resource Group we will be using is called Blog.
Creating the Build pipeline
Now that we have the connections in place, we can start with the Continuous Integration (CI) pipeline. In this pipeline, we want to achieve the following objectives:
- Validate our Bicep templates to prevent merging broken code, and
- Create an Artifact that will hold a snapshot of the files we need for the deployment
To explain further, I prefer a clean separation of Builds and Releases. This allows for better management of the code, such as enabling reusability. Creating Artifacts as part of the pipeline, rather than referencing the Git repository directly in the Release, help us ensure our Releases always use the version of the code that we expect, automatically, without forcing us to select the version of the code manually.
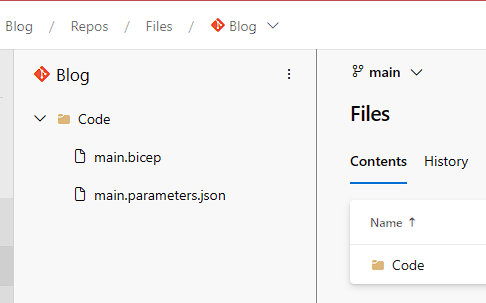
For simplicity, let's assume our Git repository contains only the following files inside a Code folder:
Start by going to the repository's root path in Azure DevOps, and click on the 'Set up build' button, typically at the top-right side of the screen. This will take you to the Pipeline creation wizard, where you will be asked to select a starting pipeline. Since there is no template for Azure Resource Manager or Bicep deployments, you can start with the 'Starter pipeline' template. This will give you a YAML pipeline akin to:
trigger:
- main

pool:
  vmImage: ubuntu-latest

steps:
- script: echo Hello, world!
  displayName: 'Run a one-line script'

- script: |
    echo Add other tasks to build, test, and deploy your project.
    echo See https://aka.ms/yaml
  displayName: 'Run a multi-line script'
Note that the pool configuration may vary greatly depending on whether you use Microsoft hosted agents or self-hosted ones. For this tutorial, the agent used doesn't matter, as long as the Azure CLI is installed. We can now start by removing the unnecessary steps and adding our owns.
First, let's ensure Bicep is installed:
trigger:
- main

pool:
  vmImage: ubuntu-latest

steps:
- task: AzureCLI@2
  inputs:
    azureSubscription: 'BicepDeploymentConnection'
    scriptType: 'bash' # You could also use Batch or PowerShell if desired
    scriptLocation: 'inlineScript'
    inlineScript: 'az bicep install'
Next, we can perform the validate command.
- task: AzureCLI@2
  inputs:
    azureSubscription: 'BicepDeploymentConnection'
    scriptType: 'bash'
    scriptLocation: 'inlineScript'
    inlineScript: 'az deployment group validate --resource-group Blog --template-file Code/main.bicep --parameters Code/main.parameters.json'
Once the validation succeeds, we can copy over only the files that we need for the Artifact. Since our Bicep code is stored in the Code folder, we can copy that entirely.
- task: CopyFiles@2
  inputs:
    Contents: 'Code/**'
    TargetFolder: '$(Build.ArtifactStagingDirectory)'
Finally, we need to publish the Artifact to Azure DevOps:
- task: PublishBuildArtifacts@1
  inputs:
    PathtoPublish: '$(Build.ArtifactStagingDirectory)'
    ArtifactName: 'drop'
    publishLocation: 'Container'
All together, our pipeline code should be similar to:
trigger:
- main

pool:
  vmImage: ubuntu-latest

steps:
- task: AzureCLI@2
  inputs:
    azureSubscription: 'BicepDeploymentConnection'
    scriptType: 'bash'
    scriptLocation: 'inlineScript'
    inlineScript: 'az bicep install'

- task: AzureCLI@2
  inputs:
    azureSubscription: 'BicepDeploymentConnection'
    scriptType: 'bash'
    scriptLocation: 'inlineScript'
    inlineScript: 'az deployment group validate --resource-group Blog --template-file Code/main.bicep --parameters Code/main.parameters.json'

- task: CopyFiles@2
  inputs:
    Contents: 'Code/**'
    TargetFolder: '$(Build.ArtifactStagingDirectory)'

- task: PublishBuildArtifacts@1
  inputs:
    PathtoPublish: '$(Build.ArtifactStagingDirectory)'
    ArtifactName: 'drop'
    publishLocation: 'Container'
Remember to watch out for invalid indentation or white spaces in the YAML. You can use the Validate function of Azure DevOps to check for these typical errors.
You can now save the pipeline so that Azure DevOps creates it. Notice that, for the Bicep validation to succeed, you will have to provide values to all the variables in the parameters file, as they are all mandatory.
Once the Build pipeline succeeds, you will be able to see the Artifact that was generated, and the code within it, as follows:

Notice that nothing in this pipeline code is specific for this project, but rather, it could be reused for any number of Bicep projects, which makes this a great template pipeline for reusability. The name of the resource group can easily be parametrized for this.
Creating the Release pipeline
For the Release, we want to do at least the following:
- Replace all the variables in the parameters file with per-environment values
- Deploy the Bicep templates to our resource group
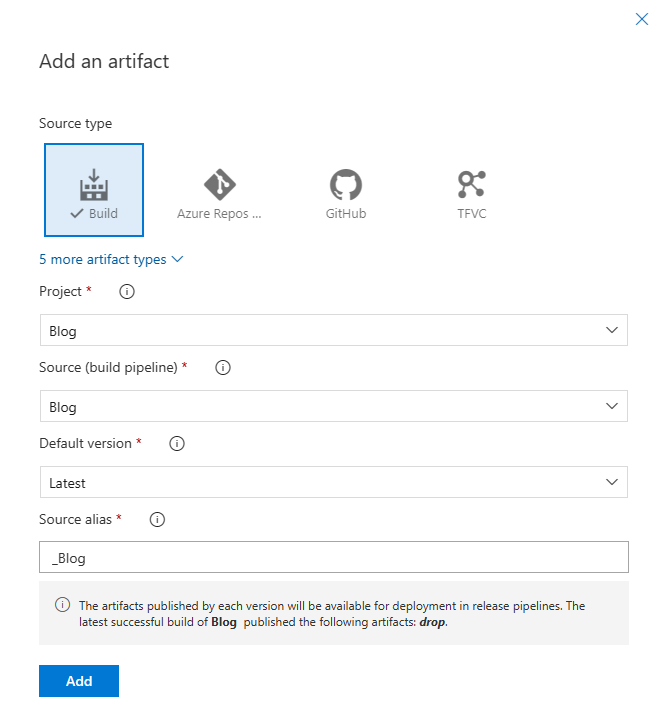
We'll start the Release pipeline creation using the Empty job template, as there is no built-in template that does what we need. Next, we have to select the Build Artifact from our Build pipeline as the Artifact source for this Release:
To achieve the first part of our goals, we need to add a File Transform task, using the JSON file format:
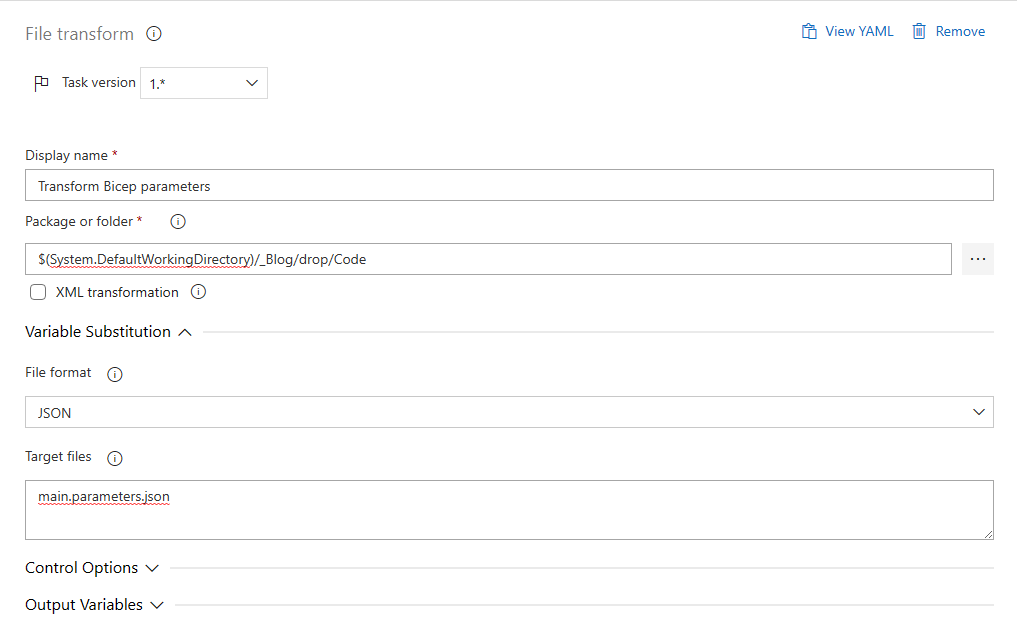
This task takes care of replacing all the values that we define in the parameters JSON file. We will add the variables soon, but,
for now, let's add an Azure CLI task to run the az deployment group create command that will actually do the deployment:

The only difference between our validation and deployment code is the change from validate to create. We also parametrized the Resource Group name for the deployment task, so that we can clone the entire stage and only have to change variables. Speaking of variables, we can now create them, as the last step for this blog.
We need 4 variables for this Release:
- ResourceGroup: the name of the Resource Group to which our resources will be deployed.
- 3 variables that correspond to the 3 parameters in our Bicep main template. These are prefixed with
parameters.and suffixed with.value, to accommodate to the JSON schema.
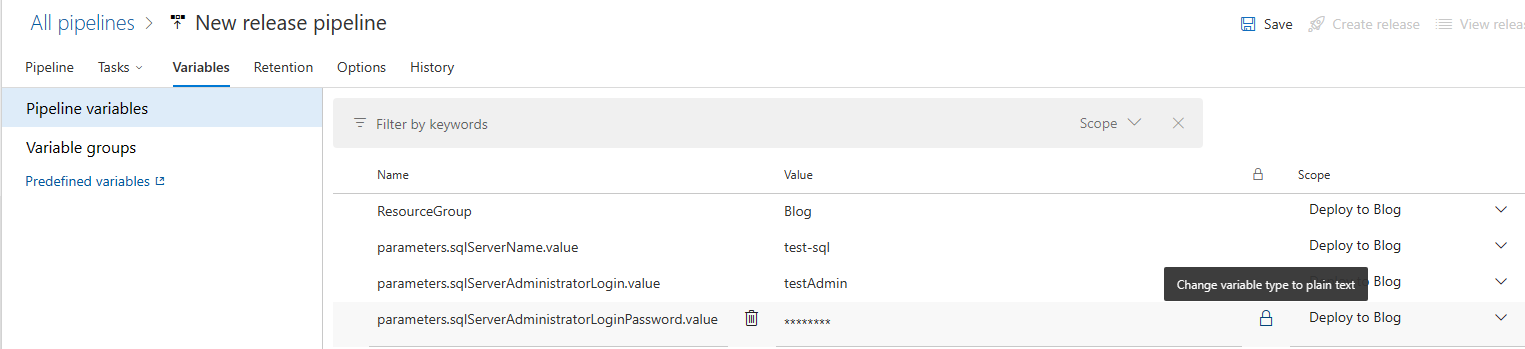
As you can see, we made the variable for the password for the SQL Server administrator user to be a secret variable. Once made secret, the value cannot be retrieved or have its scope changed, and Azure DevOps changes the output logs to show a series of * when the variable is referenced.
Notice that we did not enable the Continuous Deployment trigger for the Artifact, which means that Releases won't be created automatically. You may want to enable this, and, for certain environments, enable pre-deployment approvals, for example.
To finalize, give the release pipeline an appropriate name, such as Blog Bicep Release, and save. You can now create a release and wait for it to finish.
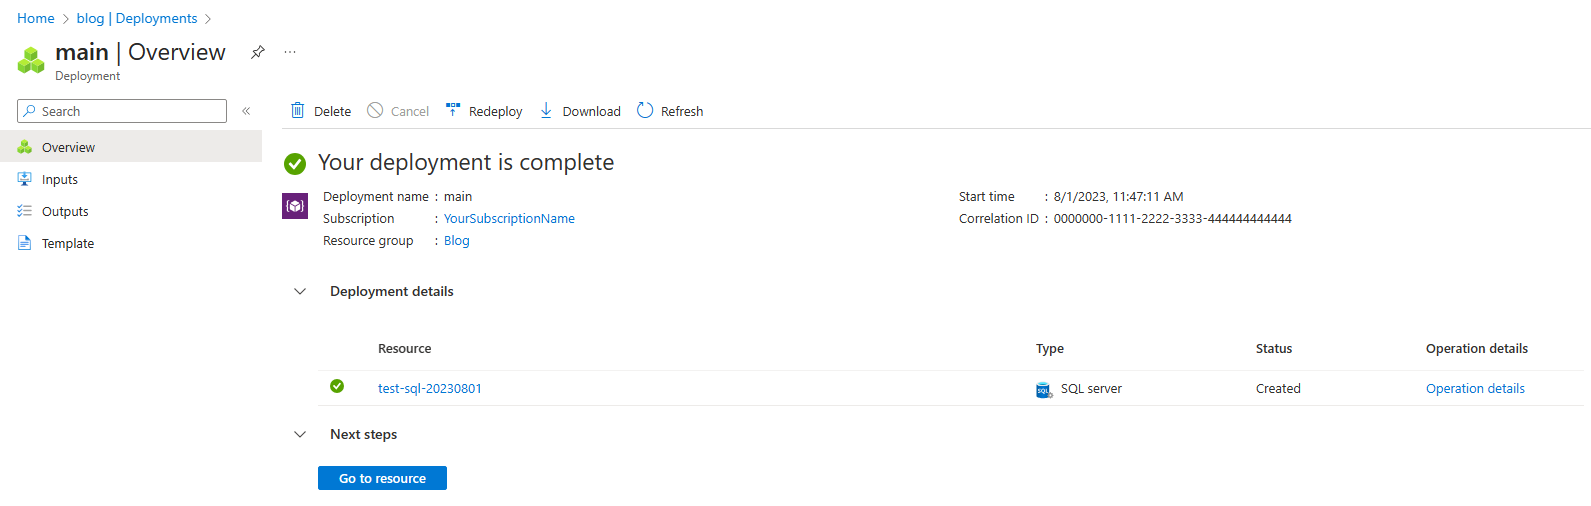
You can head over to the Resource Group to which you are making the deployment, open the Deployments tab (under Settings), and track the status of the deployment there as well:
Conclusion
I hope this post helps you define a DevOps strategy for Bicep projects. Both the Build and Release pipelines can be reused easily with the built-in Azure DevOps functionality. Let me know in the comments section (or via email) your thoughts and questions, and if you would like me to create a follow up post with more advanced content.