My other posts
Microservices with Azure Container Apps and Bicep templates
Table of contents
Introduction
Azure recently launched Container Apps into General Availability. As a brief summary, this service allows you to run containerized workloads that need scalability in a very cost-efficient way. Container Apps abstract the underlying Azure Kubernetes Service instance and allows you to focus more on the development side of it. As with the rest of my posts, this one intends to be technical and focused on implementation, for more details about features and pricing, please see the official documentation.
Container Apps can be much, much cheaper than what Container Instances, App Services, and Functions are. And so much easier to manage than Azure Kubernetes Service. Especially when considering the network functionalities that are available, such as VNET integration.
Sample architecture
While we could certainly use a number of Azure services to increase security and etc., I'll focus here on a simple architecture with a good level of security while keeping costs low and maintenance burden to a minimum.

Reference implementation
Now, the idea of this post is to show how this can be done from a CI/CD pipeline perspective, rather than the actual code implementation, as that varies greatly based on needs. Let's assume there are 4 different microservice images in a Docker Registry (it could be in Azure Container Registry or elsewhere).
In this post we will:
- Create an Azure Bicep template for deploying the Container App Environment and its applications
- Go through typical application needs in production that we can automate and secure through the deployment
This could be automated as follows:
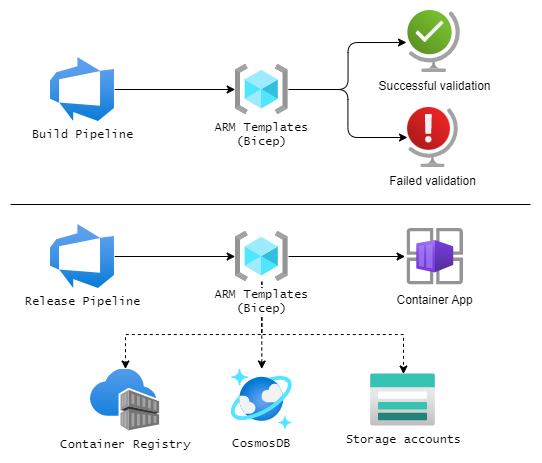
- A Build pipeline that runs a validation against the Bicep templates (using for example
az deployment group what-ifcommand). - A Release pipeline that runs after a successful validation to deploy the services (or update them, if previously deployed).
Bicep templates
In this section, we will build the templates needed for the deployment. We'll need:
- A VNET with a Subnet - this is needed to connect the Azure services to the containers.
- A Log Analytics Workspace - this is where the Container Apps Environment will send logs from the containers and system to.
- A Container Apps Environment - this is the resource that manages the containers.
- A set of 4 Container Apps - these are our applications, each hosted in a different container.
- Extra services - these are not needed, but serve the purpose of the demo.
Note: these templates can be written all in the same file or separated as needed. I added descriptions to all parameters to help identify the need for each one.
Creating the VNET
The first resource that we need for this deployment is the Virtual Network (VNET). This will allow us to securely connect to services we need (like CosmosDB) without exposing them to the internet.
The following template accomplishes this. Notice that the subnet has to be created inside the VNET. Failing to do this, each deployment would delete the subnet and recreate it.
@description('Resource group location')
param rgLocation string

@description('VNET resource name')
param vnetName string

@description('VNET Address Space (CIDR notation, /23 or greater)')
param vnetAddressSpace string = '10.0.0.0/22'

@description('Subnet resource name')
param containerAppSubnetName string

@description('Subnet Address Prefix (CIDR notation, /23 or greater)')
param subnetAddressPrefix string = '10.0.0.0/23'

resource vnet 'Microsoft.Network/virtualNetworks@2022-01-01' = {
  name: vnetName
  location: rgLocation
  properties: {
    addressSpace: {
      addressPrefixes: [ vnetAddressSpace ]
    }
  }

  resource subnet 'subnets@2022-01-01' = {
    name: containerAppSubnetName
    properties: {
      addressPrefix: subnetAddressPrefix
      serviceEndpoints: [
        {
          service: 'Microsoft.Storage'
          locations: [ rgLocation ]
        }
      ]
    }
  }
}
The ServiceEndpoint declared in the subnet above allows us to reach the Storage Account directly from the Container Apps.
Creating the LAW
The next thing we need is the Log Analytics Workspace (LAW). The Container Apps Environment automatically sends logs and analytics to this workspace.
@description('Resource group location')
param rgLocation string

@description('Log Analytics resource name')
param cappLogAnalyticsName string

resource logAnalytics 'Microsoft.OperationalInsights/workspaces@2021-06-01' = {
  name: cappLogAnalyticsName
  location: rgLocation
  properties: {
    sku: { name: 'PerGB2018' }
  }
}
There are many other properties that can be configured if/as needed. The above is the bare minimum template.
Creating the Container Apps Environment
With the base services defined, we can move on to creating the Container Apps Environment. This is where the containers are deployed to, and so requires the Id of the subnet and a few extra networking parameters.
@description('Resource group location')
param rgLocation string

@description('Container Apps Environment resource name')
param cappEnvName string

resource containerAppEnvironment 'Microsoft.App/managedEnvironments@2022-03-01' = {
  location: rgLocation
  name: cappEnvName
  properties: {
    appLogsConfiguration: {
      destination: 'log-analytics'
      logAnalyticsConfiguration: {
        customerId: logAnalytics.properties.customerId
        sharedKey: logAnalytics.listKeys().primarySharedKey
      }
    }
    vnetConfiguration: {
      infrastructureSubnetId: vnet::subnet.id
      dockerBridgeCidr: dockerBridgeCidr
      platformReservedCidr: platformReservedCidr
      platformReservedDnsIP: platformReservedDnsIP
    }
  }
}
Notice that vnet::subnet above means "from the VNET resource, get the inner resource named subnet".
Creating the Container Apps
The following step would be to create the 4 Container Apps (one for each API/service). It would be too long to repeat it 4 times, so here's the basic idea:
@description('Resource group location')
param rgLocation string

@description('Docker Registry URL')
param dockerRegistryUrl string

@description('Docker Registry username')
param dockerRegistryUsername string

@secure()
@description('Docker Registry password')
param dockerRegistryPassword string

@description('Public API Container App resource name')
param publicApiCappName string

@description('Public API Docker image name')
param publicApiImageName string

resource publicApi 'Microsoft.App/containerApps@2022-03-01' = {
  name: publicApiCappName
  location: rgLocation
  properties: {
    managedEnvironmentId: containerAppEnvironment.id
    configuration: {
      secrets: [
        {
          name: 'registry-password'
          value: dockerRegistryPassword
        }
      ]
      registries: [
        {
          passwordSecretRef: 'registry-password'
          server: dockerRegistryUrl
          username: dockerRegistryUsername
        }
      ]
    }
    template: {
      containers: [
        {
          image: '${publicApiImageName}:latest'
        }
      ]
      scale: {
        maxReplicas: 1
        minReplicas: 1
      }
    }
  }
}
The above registers the Container Registry into the Container App (to be able to download the image) and then specifies the image to download and the scaling needs.
The above acts as the base of the template, and additional configuration is needed then per app.
The following sections show examples of configurations that can be achieved with this.
Adding the internal services URLs to the Public API
First, you need to enable HTTP ingress in the Container Apps, like this:
configuration: {
    secrets: [ ... ]
    registries: [ ... ]
    ingress: {
        external: true
        targetPort:80
    }
}
You then have access to the Fully Qualified Domain Name (FQDN) as follows:
publicApi.properties.configuration.ingress.fqdn
So, if we wanted to have the URL for the Command and Query services in the Public API, we can do this:
containers: [
    {
        image: '${publicApiImageName}:latest'
        env: [
            {
                name: 'MICROSERVICES__QUERY_URL'
                value: queryApi.properties.configuration.ingress.fqdn
            }
            {
                name: 'MICROSERVICES__COMMAND_URL'
                value: commandApi.properties.configuration.ingress.fqdn
            }
        ]
    }
]
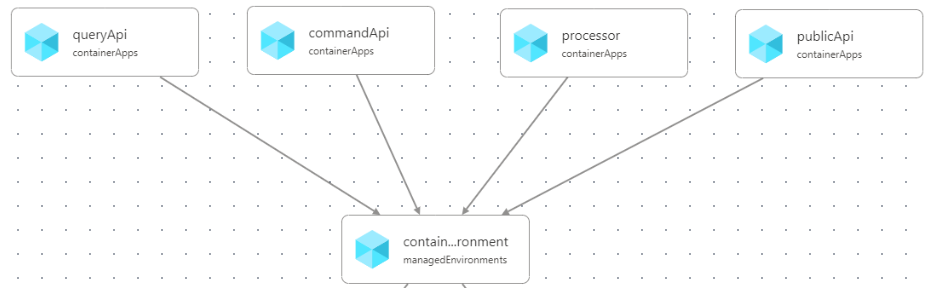
What if we wanted to see how these resources depend on each other? Visual Studio Code has a Bicep extension that automatically generates an interactive diagram.
For example, before we add the properties to the environment (and there are no dependencies):
After we add the properties (and hence dependencies), the layout changes to reflect this:
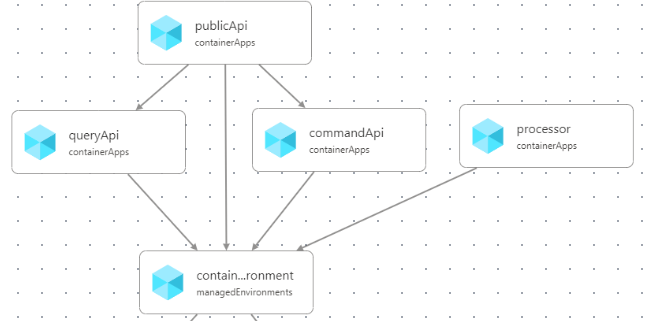
Since Bicep doesn't support cyclic dependencies (i.e., Public Api => Query Api => Public Api), you need to plan your dependencies. Bicep will generate a helpful error message if you try to add a cyclic dependency.
Adding additional services
We can also add additional services and get both common properties (such as URLs) and secrets, and add them to environment variables for the app that needs them. For example, deploying a Storage account and getting a connection string for it:
resource storageAccount 'Microsoft.Storage/storageAccounts@2021-02-01' = {
  name: storageAccountName
  location: rgLocation
  kind: 'StorageV2'
  sku: {
    name: 'Standard_LRS'
  }
  properties: {
    networkAcls: {
      defaultAction: 'Deny'
      bypass: 'AzureServices'
      virtualNetworkRules: [
        {
          id: vnet::subnet.id
          action: 'Allow'
        }
      ]
    }
  }
}

var blobStorageConnectionString = 'DefaultEndpointsProtocol=https;AccountName=${storageAccountName};EndpointSuffix=${environment().suffixes.storage};AccountKey=${storageAccount.listKeys().keys[0].value}'
If we wanted to add it to the Command API then:
resource commandApi 'Microsoft.App/containerApps@2022-03-01' = {
  name: commandApiCappName
  location: rgLocation
  properties: {
    managedEnvironmentId: containerAppEnvironment.id
    configuration: {
      secrets: [
        ...
        {
          name: 'storage-connection-string'
          value: blobStorageConnectionString
        }
      ]
      registries: [ ... ]
    }
    template: {
      containers: [
        {
          image: '${commandApiImageName}:latest'
          env: [
            {
              name: 'SERVICES__STORAGE_CONNECTION_STRING'
              secretRef: 'storage-connection-string'
            }
          ]
        }
      ]
      scale: { ... }
    }
  }
}
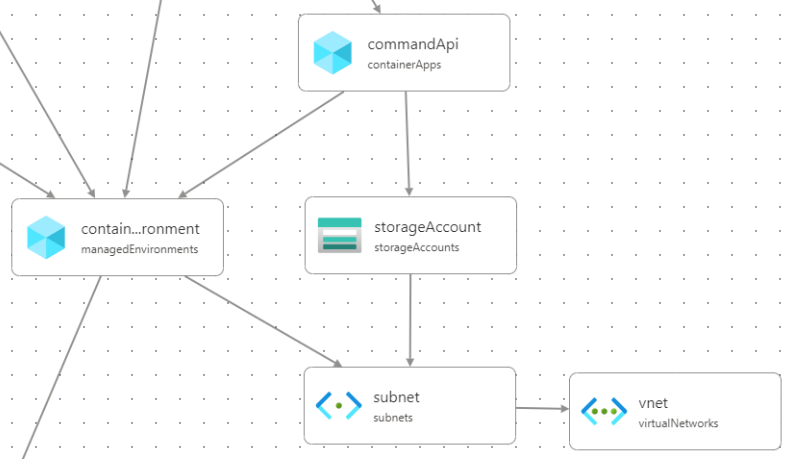
And the Bicep visualizer immediately updates to show us this new relationship between the services:
Wrapping up
You can find the code used in this sample in my GitHub demos repository.
These are just examples of things that can be achieved rather easily using Container Apps and Bicep. This templates above allow us to ensure the correctness of infrastructure configuration (such as URLs to services) as well as preventing secrets from being committed to source control.
Notice how this also allows us to skip paying for using Azure Key Vault too, while also simplifying the administration.
Bicep projects can (and should) also be treated with CI/CD (Continuous Integration and Continuous Delivery), and if you are interested in doing that with Azure DevOps, see this blog post of mine.